Quickstart: MIDI to a looping animation in minutes
By the end of this page, you will have a full marble music animation: a marble that strikes a key on every note, plays it in time, and loops with no visible seam. Everything here works in Marble Studio Free.
Before you start
You need:
- Blender 4.2 or newer with Marble Studio installed and switched on (see Install and activate).
- A MIDI file. Any length works, in Marble Studio Free too. A short single-part MIDI is the simplest start: a scale, or a phrase you wrote.
- Optional (but important): the song's audio file (
.wav,.mp3or.flac). Most people will want to hear the song while they work. Give it exactly the same name as the MIDI and put it in the same folder (for examplemy_song.midandmy_song.wav). Marble Studio finds it and lines it up with the notes. - The song's tempo: if you know it, it helps you pick a frame rate (see Tempo and frame rate). Not a music person? Skip it: Marble Studio reads the timing straight from the MIDI.
1. Start a new file
- Choose File > New > General. No template is needed: Generate builds everything.
- Save the file under your song's name straight away.
- In the 3D Viewport, press N to open the sidebar and click the Marble Studio tab. Generate is open and the other sections are folded until you need them.
2. Choose the frame rate
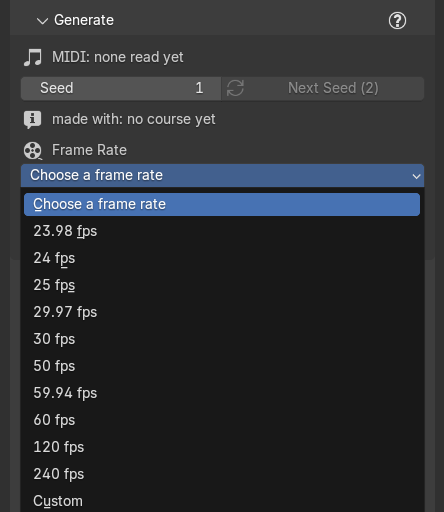
In the Generate section, directly above the Generate Course from MIDI button (below Seed, Next Seed and the "made with" line), is the Frame Rate drop-down. In a new file it reads Choose a frame rate, and Generate Course from MIDI is grayed out, with the reason under it: "Choose a frame rate above first."
- Open the drop-down and pick the rate you will render and deliver at (the same list as Blender's own Output > Format panel: 23.98, 24, 25, 29.97, 30, 50, 59.94, 60, 120, 240, or Custom).
- Generate un-grays.
If you're posting to socials, 30 and 60 fps are good standards. If you'd like to adjust your MIDI's BPM to best match your frame rate, see Tempo and frame rate.
Choose carefully: once the course exists the rate is locked. The drop-down grays out with the note "Set when the course was generated; start a new file to change it." See Frame rate for why, and Tempo and frame rate for picking a rate that suits your song's tempo.
3. Generate the course
- Click Generate Course from MIDI.
- In the file window, pick your MIDI. If it holds more than one part, the file window's side panel lists them under "Which part to play:". Set Part to the part you want (see Track Selection).
- Click Generate Course from MIDI in the file window.
A moment later the course is there. The status bar reports what happened, for example "Generated 24 keys from track 0 'Piano'." When it finishes you are looking through the camera, ready to press play. In EEVEE the report may add "Raytracing switched on in Render Properties so the glass marble looks like glass in EEVEE.": it does that once per file, never in Cycles, and never again if you turn it off (see The marble's look).
What arrives in the file:
- The marble: the glass Hero Marble, built in to both editions, with three thin crossing circles around it (the rotation cage) so you can see the rotation, even in solid view. The cage never renders.
- The keys and their bases, one key per note.
- The wall behind the course, in one plain color you can change in Wall Surface. In Marble Studio Pro you can switch it to an image or a material later.
- The looping camera, set as the scene camera (Camera (Looping)).
- Lighting: a world with an HDRI image, which the glass marble reflects.
- MIDI markers on the timeline, one per note, and the song's audio if a matching audio file (
.wav,.mp3or.flac) was beside the MIDI. Its waveform shows in the Video Sequencer, not in the Timeline. - The frame range, set to exactly one loop.
- A record of how it was made, under the Seed field in the Generate panel, for example "made with seed 1 · my_song.mid · track 0 · 60 fps".
If Blender's Default Cube, Light, and Camera were still untouched, Generate removes them and the report says so. Anything you changed or added is left alone.
Try another layout
Click Next Seed beside the Seed field in the Generate panel to rebuild the same song with a different arrangement. No file window: it reuses the MIDI and part you just picked.
Don't undo a Generate
Do not press Ctrl+Z straight after Generate or Next Seed: it can crash Blender. Save first, and re-open the file to go back. See Known issues.
4. Play it and check the seam
- Put the mouse over the 3D Viewport and press Space to play. Press Space again to stop.
- Watch the marble strike a key on every note. With the audio loaded, you hear the song play in time with the animation.
- Let it run past the end. Blender jumps back to the first frame and the marble carries on without a jump. That's the loop.
- Glance at the top of the Marble Studio tab: the header shows a colored light and two numbers, the red and yellow rows in Course Check. Open Course Check at the bottom of the tab to read them.
- You are already looking through the camera. Press Num 0 to go back to your own view, and again to return.
If the loop restarts too soon after the last note, slide the loop note later with Loop Nudge in the Seam section (Loop Nudge). If the Course Check row turns red, that nudge can't land: the row tells you why, and which value will.
If playback stutters, switch the viewport to Solid shading while you watch the timing. The timing lives in the keyframes, so it is the same at any playback speed.
In Material Preview the M inside the marble can look green: that is Blender's studio light. Tick Scene World in the viewport's shading options to see it as it renders. Renders are not affected.
5. Adjust a key (optional)
- Click a key and rotate it (R, move the mouse, click to confirm).
- A moment after you let go, the course after it re-flows so the marble still strikes every later key on its note. The loop stays closed.
Keys only turn: Blender's move (G) and scale (S) do nothing to a key, because the course places every key. Never press Ctrl+Z right after Generate or Next Seed. After an edit, undo works as usual, though some edits take two presses to step back (Course Check's Edit not settled row tells you when). Every editing tool is on the Course Editor page.
6. Render the loop
- In Output Properties (the printer icon in the Properties editor), leave Frame Start, End, and Frame Rate as they are: the range is exactly one loop.
- Render as you normally would. If you may want to move the start frame later with Reorder Frames, render an image sequence such as PNG or EXR.
- For sound that loops with the picture, choose Render > Render Audio... with the frame range as it is. Blender writes the song's audio for exactly that loop, starting on its first frame. (The song's own audio file is not cut to the loop, so it does not repeat in step with the frames.)
- In your video editor, put the audio on the timeline under the frames, both starting on the same frame, and set them to repeat. It plays forever without a cut.
Want the loop to start on a different frame, for a better first frame on social media? That is optional: most
video editors can start the clip anywhere. If yours cannot, set a loop start in the Render Loop section and press
Reorder Frames... on the rendered image sequence. When the song's audio is loaded, it also writes loop_audio.wav,
the loop's audio turned to the same start. See Reorder Frames.
Next steps
- The perfect loop: what the seam is and how the loop is built.
- Camera (Looping): frame the shot.
- Recipes: vertical framing for Shorts, taking the loop into a video editor.