Wall Surface
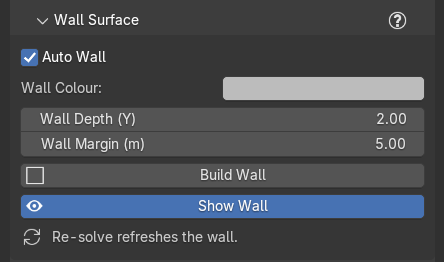
The wall is the flat backdrop behind the course. Generate builds it for you, sized to what the camera sees, and keeps it in step with the course. In Marble Studio Free the wall is one plain color you choose. Marble Studio Pro adds patterns, images, and materials, laid out so that after one loop of travel the pattern looks exactly the same, so the wall never gives the seam away.
Build Wall
Build Wall builds (or rebuilds) the wall: one flat plane behind the keys, sized to what the camera sees plus a margin. Once it exists, every re-solve refreshes it ("Re-solve refreshes the wall."). A press reports, for example, "Built looping wall (plain color). The seam closes by construction; Re-solve refreshes it." (in Pro it names image, material, or checker instead of plain color for those surfaces, and if the decor ghosts could not follow, it adds "The decor ghosts could not be rebuilt: ..."). Without a course it refuses: "Could not build the wall (need a generated course with a loop note)."
- Auto Wall (on by default): builds the wall automatically after Generate, re-solves, and settles. Off means only Build Wall builds it; a wall that already exists still follows re-solves.
- Wall Color: the wall's color. Click the swatch to change it.
- Show Wall: shows or hides the wall in the viewport and the render. Unticked, it is gone everywhere.
- Wall Margin (m): extra meters beyond the course and camera on each side (5 for a new course). Over-sizing is harmless.
- If the camera has changed since the wall was built, Course Check shows a yellow row, Wall out of date: "Camera changed - rebuild wall". Press Build Wall so its edges stay out of shot.
The wall cannot be clicked in the viewport, so a stray box-select never moves it.
Your own image on the free wall
In Marble Studio Free, an image or material you put on the wall by hand is not laid out for the loop, so its pattern can jump at the seam. Seam-matched images and materials are in Marble Studio Pro.
Wall Depth
Wall Depth (Y) is how far behind the keys the wall sits (2.0 for a new course). It also sets how far the key bases' braces (and, in Pro, the tracks' braces) reach back to meet it, so changing it rebuilds the shared base mesh once.
Tile size Pro
A new wall's pattern starts at about 8 m per copy. The pattern must repeat a whole number of times across one loop of travel for the seam to stay invisible, so the size you get lands near 8 m, not on it. Small sizes make many tiny copies that read as blur or stripes.
The Tile size: − / + buttons (Step Wall Tile Size) step between sizes that keep the seam invisible: + bigger tiles, fewer repeats; − smaller, more repeats. The readout shows what you got, for example "Tile 9.62 m |phi| 3.1 deg": the tile size, and how many degrees the pattern is tilted to keep the seam invisible (with Follow course it shows the tilt alone, "Rotation 3.1 deg"). A press reports "Tile 9.62 m, |phi| 3.1 deg (seam closed)."
- About one press in four changes nothing, because two neighboring targets can land on the same seamless tiling. Press again.
- At either end it says "Wall pattern already at its largest tile size." (or smallest).
- It refuses without a wall or a course: "No wall to resize (build one first).", "No course to size the wall against (generate one first).", or "Can't step the wall tile size (...)." with the reason.
Advanced:
- Tiling: Balanced (upright) (default) picks the least-tilted seamless tiling, so the pattern stays upright. Follow course is the older style: the pattern leans with the course's direction of travel.
- Scale Band: how far the Balanced search may drift the tile size from your target to keep it upright (1.25 = up to ±25%).
If the wall had to change its tile to stay seamless, Course Check says so in a yellow Wall tiling row.
Straighten Pro
A tiling image or material sits at a slight tilt so the seam can close. Straighten stands the pattern upright at your tile size, and the course gives a little instead: one press moves the course slightly so the loop still closes. It is under the Tile size: buttons.
- After a press the section shows how far it went, for example "Straightened: upright", "Far end moved 0.4 m", how far the far end of the loop traveled, "Each flight under 3 cm", "Decor near loop end may move", and "Ctrl+Z puts it back".
- One Ctrl+Z puts everything back, the tile size included.
- When the wall can't be straightened at its current tile size but can at a nearby one, it asks first. The question, "Straighten the Wall?", says "The wall can't be straightened at its current tile size.", "With the tile at 8.40 m (now 8.00 m), it can.", "The course would move up to 0.6 m at the far end.", and "Ctrl+Z puts it all back, tile size included." Press Change Size and Straighten to do both, or close it to change nothing.
- The button is grayed with its reason when it can't run, for example "Build the wall first", "Pick Image or Material", "Needs Balanced tiling", "Tile too small: try +", or "Already upright".
Rotate Pro
Rotate 90 deg turns the wall pattern a quarter turn; the angle shows beside the button. The seam stays invisible at every angle and a rebuild keeps your choice. "Wall rotated to 90 deg (seam still closed)." Without a wall: "No wall to rotate (build one first)."
Custom material Pro
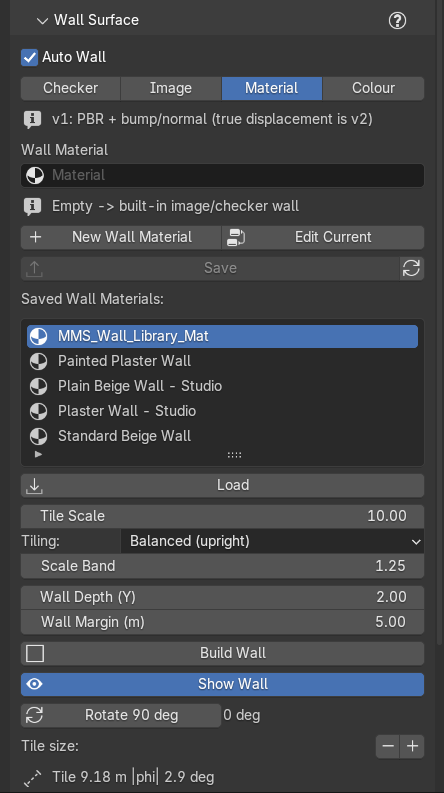
Surface chooses what feeds the wall, as a row of three buttons, Color, Image, and Material. A new wall starts on Color, in both editions:
- Image: tiles an image file. Pick it in Wall Image; empty shows a checker, handy for eyeballing the seam before you add real art ("Empty -> procedural checker").
- Material: drives the wall with a material of your own (full PBR plus bump and normal maps):
- Wall Material: the material. Empty falls back to the built-in wall ("Empty -> built-in image/checker wall").
- Under the field, a reminder: "Reads the wall's UVs. The seam matches only if the pattern repeats once per tile - a seamless image does; the add-on cannot check an image." If a texture in the material reads other coordinates, so the seam will jump, Course Check shows a red row, Wall seam jumps, for example "Noise Texture does not repeat once per tile, so the wall will jump at the loop seam. Use a seamless image, or New Compliant Wall Material's wrapped noise.", or, when a texture reads the Texture Coordinate node instead of the wall's UVs, "Wall material samples 'Object' coordinates (Texture Coordinate) instead of UVMap -- the loop seam may show. Rewire textures to a UV Map node reading 'UVMap'."
- New Wall Material: makes a neutral plaster material that is seam-safe from the start and switches the wall to Material mode (or says "Could not create a wall material.").
- Edit Current: makes the wall the active object so the Shader Editor shows its material, without selecting it (no scrolling the Outliner): "Wall is now the active object -- edit its material in the Shader Editor." (adding "(Wall is hidden; its material is still editable.)" when it is hidden). It refuses with "No wall to edit -- build the wall first.", "The wall has no material yet -- pick or create one first.", or "The wall's 'MMS Wall' collection is excluded from the view layer -- re-enable it in the outliner (its checkbox) to edit its material."
- Save, Saved Wall Materials:, and Load: keep wall materials in the Marble Studio library, as on the other material sections. Save asks for an Asset Name; with no material it says "Pick a material first."
- Color: the plain one-color wall, with its Wall Color swatch (before the first build it says "Build Wall makes the plain color wall"). A song made in Marble Studio Free opens on Color.
Recipe: a brick wall that loops. Set Surface to Material, press New Wall Material, then
Edit Current and replace the plaster with your brick textures, each fed from a UV Map node reading UVMap.
Check Course Check shows no Wall seam jumps row, then step Tile size until the bricks look the right size.