Song Reference
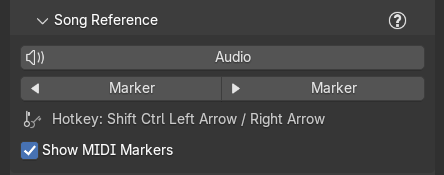
The Song Reference section keeps the song lined up with the picture: note markers on the timeline, the song's audio in the sequencer, and a quick way to hop from note to note. It sits third, under Setup.
MIDI markers
Generate puts one timeline marker on every note, named by note order (N001, N002, ...), for the part you chose
in Track Selection. If they go missing (deleted by hand), Course Check shows MIDI markers lost with a Rebuild Markers action that puts them back and
reports, for example, "24 markers from track 0 'Melody'." If the MIDI holds no notes it says "No note tracks
found in MIDI.", and if the file cannot be read, "MIDI parse failed: ...".
Show MIDI Markers (on by default) shows the note markers on the timeline. Untick it to declutter the timeline while you work; only the MIDI markers are hidden, nothing else is touched.
Jump between markers
A row of two Marker buttons (left and right arrows) moves the playhead to the previous or next MIDI marker: the strike before or after the current frame. The line under them shows their hotkeys from your own keymap, for example "Hotkey: Shift Ctrl Left Arrow / Right Arrow" (Ctrl+Shift+Left and Ctrl+Shift+Right by default, Shift+Cmd+Left / Shift+Cmd+Right also work on a Mac); when the two keys differ in more than the arrow it names both in full ("Hotkey: Shift Ctrl Left Arrow / Shift Alt Right Arrow"), and with none set it reads "Hotkey: none - use the buttons". They work with the mouse over the 3D Viewport.
With no markers and no course in the file, the buttons are grayed: "No MIDI markers yet: Generate a course to place them." At the first or last marker they stop and say so, for example "No MIDI marker after frame 1270." They still work while the markers are hidden with Show MIDI Markers.
Import Audio (WAV)
Import Audio (WAV) adds a song file (.wav, .mp3, or .flac) to the Video Sequencer with its waveform showing, lined up
with the course, and sets playback to sync with the audio. The report says the frame it starts on:
"WAV at frame 61; playback set to AV-sync."
Generate does this for you when an audio file sits beside the MIDI with the same name. Use the button when your audio lives somewhere else, or is a different mix.
Syncing audio
The audio is placed so the song's first note sounds on the first strike. Playback is set to AV-sync, so Blender drops frames rather than letting the sound drift when the viewport is slow. If the picture looks behind the sound while you play, switch the viewport to Solid; the render is always in sync.
Recipe: swap in the final mix. Delete the old sound strip in the Video Sequencer, press Import Audio (WAV), and pick the new file. It lands on the same frame, so nothing shifts.