Generate
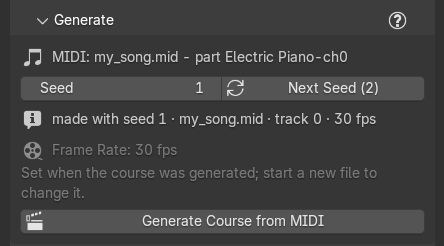
The Generate section turns a MIDI file into a course: marble, keys, bases, wall, camera, lighting, markers, and (if it finds one) the song's audio. It sits at the top of the Marble Studio tab.
From the top, the section shows:
- The MIDI line: which MIDI and part the course is made from, for example "MIDI: my_song.mid - part Piano", or "MIDI: none read yet" in a new file. For a MIDI with several parts it reads "MIDI: my_song.mid - 3 parts", with a Part row under it.
- Seed and Next Seed. The button names the seed it will make, for example Next Seed (8).
- The "made with" line: the record of how this course was made, for example "made with seed 7 · my_song.mid · track 0 · 60 fps", or "made with: no course yet". A damaged record reads "seed record unreadable".
- Frame Rate and Generate Course from MIDI.
Frame rate

The drop-down directly above Generate Course from MIDI sets the frame rate the course is built at. It offers the same rates as Blender's own Output > Format panel: 23.98, 24, 25, 29.97, 30, 50, 59.94, 60, 120, 240, and Custom (Custom shows FPS and Base fields of its own). The lowest rate Marble Studio accepts is 12 fps: a lower Custom value changes nothing and says so under the drop-down, "Marble Studio needs at least 12 fps (8 / 1 is 8). The scene's frame rate was not changed.", and Generate stays grayed.
- In a new file it reads "Choose a frame rate" and Generate is grayed out, with the reason under it: "Choose a frame rate above first." Nothing is chosen for you: pick the rate you will render and deliver at.
- Choosing writes your scene's frame rate (and its base, for 23.98, 29.97, and 59.94), only when you choose. Generate never sets the rate for you. (Generate does set Frame Start and End to one loop; see Loop range.)
- Once the course exists, the rate is locked. In place of the drop-down, the section shows the course's rate, grayed, with "Set when the course was generated; start a new file to change it." Every strike was placed on a frame of that rate, so a different rate would move every strike off its note.
If the scene's frame rate is changed by hand afterwards (in Output > Format), Marble Studio stops re-solving and says so in Course Check, in a row titled Frame rate changed: "Scene frame rate is 24 fps but this course was made at 60 fps. Nothing was re-solved. Set Output > Frame Rate back to 60 to keep editing." Put the rate back and everything works again. Generate and Next Seed refuse with the same sentence: they never re-time a course to a new rate.
If you chose a rate and then changed Output > Format before generating, Generate is grayed with "The scene is at 24 fps but you chose 30. Choose again above."
Recipe: a Shorts-friendly 30 fps loop. In a new file, choose 30 in the drop-down, then Generate. The course, markers, and audio are all laid out at 30 fps.
Pick the MIDI
Generate Course from MIDI opens a file window filtered to .mid and .midi files.
- The song must have at least two notes. There is no upper limit on its length or its number of notes, in either edition.
- Put the song's audio beside the MIDI with the same name (
my_song.mid+my_song.wav,.mp3or.flac) and Generate adds it to the Video Sequencer, lined up with the first note. If there is none, the report says "No 'my_song' audio (.wav, .mp3 or .flac) beside the MIDI - skipped the audio import." and the course is built anyway. You can add audio later with Import Audio (WAV).
Track Selection
A MIDI file can hold several parts (tracks): melody, bass, drums. The marble plays one of them.
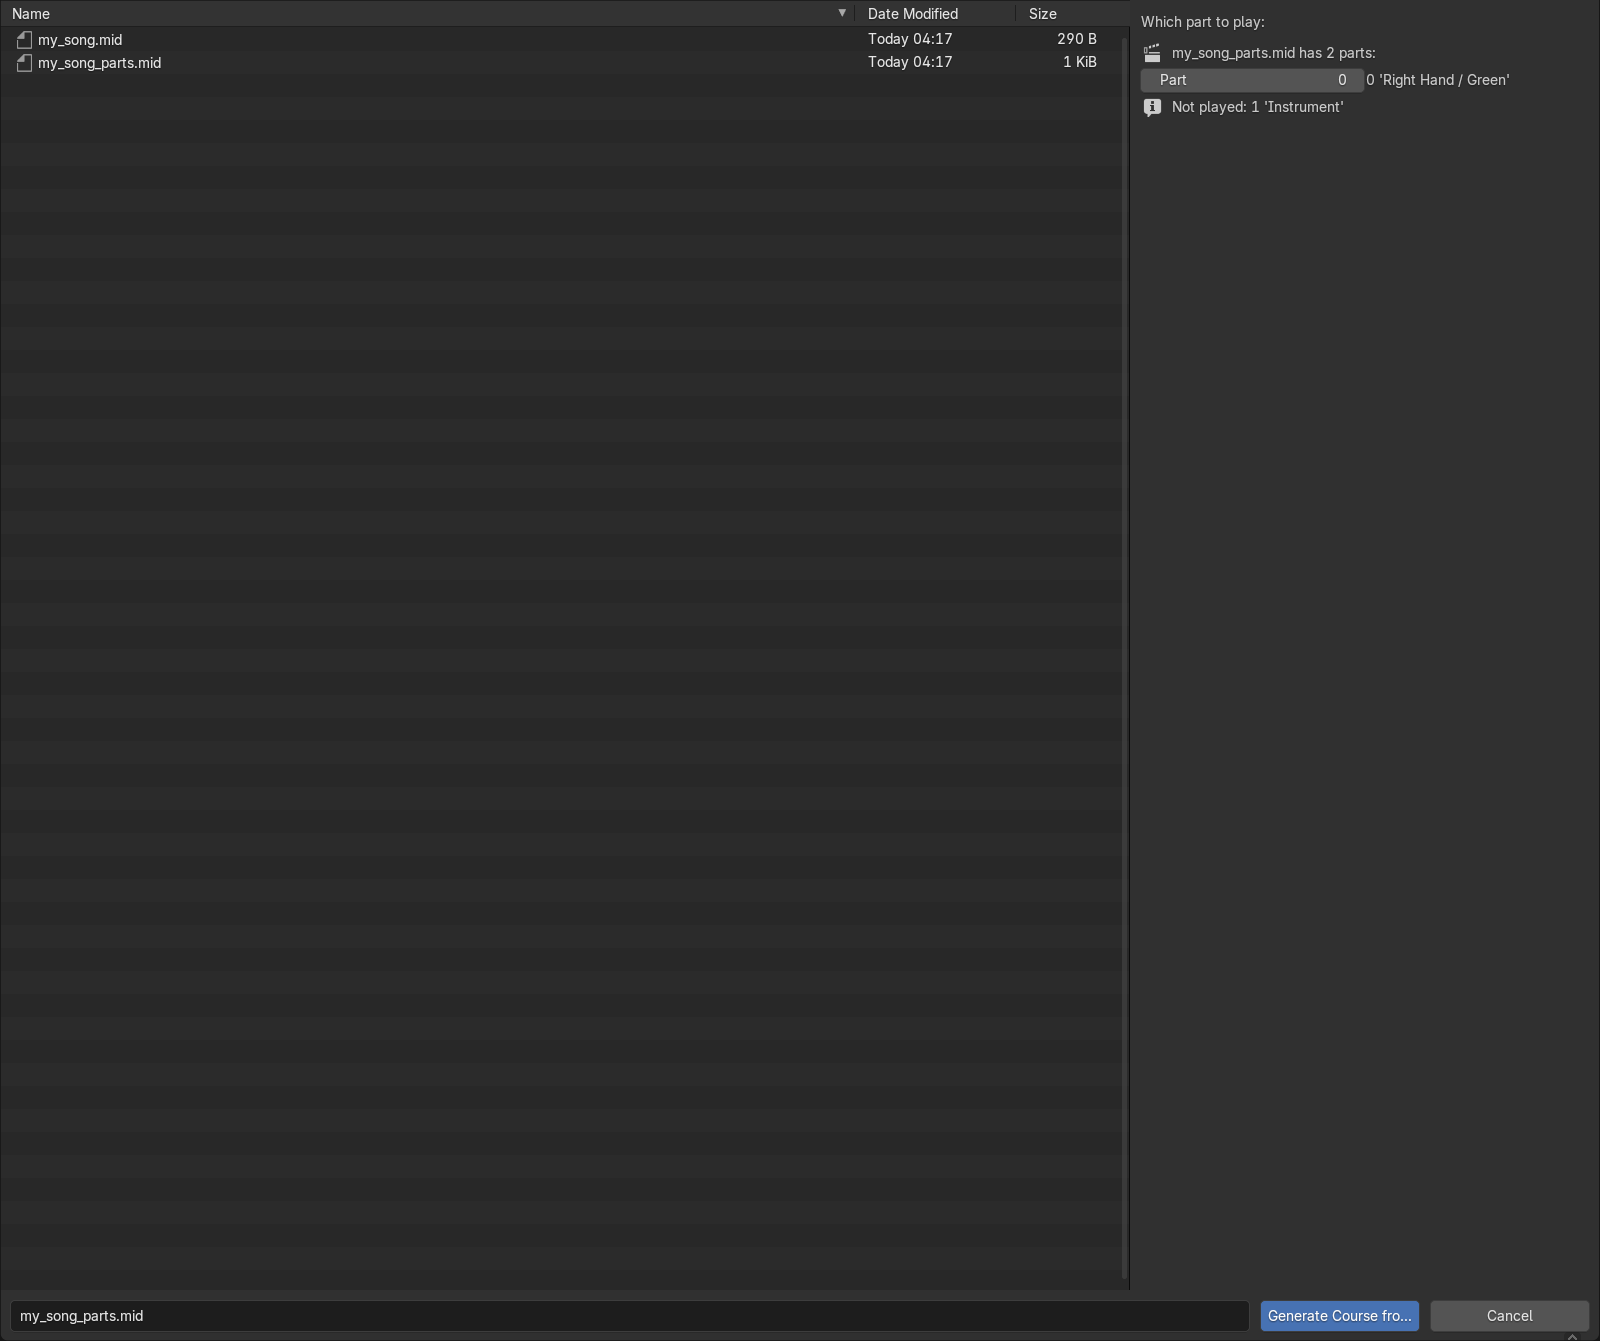
- In the file window, the side panel is headed "Which part to play:". On a one-part file it just says the file has one part. On a file with several parts it lists them with their names ("my_song.mid has 3 parts:"): set Part to the part's number. A file it cannot read says so: "my_song.mid could not be read as a MIDI". Before a file is picked it says "Pick a MIDI to see its parts."; with no MIDI read yet the side panel explains "(no MIDI read yet) Pick the MIDI when you press - if it holds two or more parts you choose which one plays in the file window, and the choice shows here afterwards." A line underneath lists the parts that will not be played, for example "Not played: 1 'Bass', 2 'Chords'".
- In the Generate section, the MIDI line shows the file and its parts, with the same Part row when there is a choice.
- After Generate, Course Check keeps two plain-fact rows about it: More MIDI parts (for example "This MIDI has 3 parts; Generate used part 0 'Melody'.") and Parts not played.
Recipe: play the bass line instead. Press Generate Course from MIDI and pick the file. In the file window's side panel, set Part to the bass part's number and confirm. Now the marble plays the bass.
Seed
The Seed picks one of many valid arrangements of the same song. Same MIDI, same part, same seed: the same course, every time, on every computer. The "made with" line under the field keeps the seed this course was actually made with, so you can always find your way back to it.
Next Seed
Next Seed rebuilds the course from the same MIDI and part with the seed one higher. No file window. The button names the seed it will build, for example Next Seed (8). Its tooltip says the same: "Re-generate from my_song.mid with seed 8 (the Seed field + 1). No file window; any seed is one typed number away in the Seed field."
- If a course exists it asks first: "Replace this course (24 keys) with seed 8? Your key edits are lost. Save first if you may want them back - don't use Ctrl+Z straight after a Generate." The dialog is titled Next Seed; click Replace to go ahead.
- The report says which seed it used, for example "Seed 8 (was 7) from my_song.mid."
- To jump to any seed, type it into Seed first; Next Seed then builds that number plus one.
- If the MIDI has moved since you generated, Next Seed refuses and says where it looked. Use Generate Course from MIDI and pick the file again.
- If the new seed cannot be built, nothing changes and the seed goes back: "Next Seed could not generate seed 8; the seed is back at 7." (with the reason in brackets when there is one: "Next Seed could not generate seed 8 (...); the seed is back at 7.").
Recipe: audition layouts. Press Next Seed a few times and play a few seconds after each. When one feels right, keep it: its seed is already on the "made with" line.
Generate Course
Generate Course from MIDI builds the whole course. The status bar report tells you what it did and anything to look at:
- "Generated 24 keys from track 0 'Melody'." The key count and the part used.
- "Removed Blender's untouched starter Cube, Light and Camera." Only objects you never touched.
- "Lighting: the built-in HDRI world." or "Kept your world 'World'." Your own world is never replaced.
- "The Loop Nudge was reset from +12 to 0." A new course starts with no nudge.
- How many strikes moved one frame later because two notes fell on the same frame, for example "3 strikes moved one frame later because two notes fell on the same frame at 24 fps." or "5 strikes moved up to 2 frames later because notes fell on the same frame at 24 fps." (see When a strike lands).
- Warnings in brackets, if any, for example "(N keys hit the placement fallback - may clip.)", "(Opening run-up cannot clear the first keys - lengthen lead-in / reshape note 1.)", "(2 key(s) are struck on the back of the face: [5, 9].)", or "(1 key(s) have a Bounce outside 0.05-1.3: [12].)".
- "Note 1 could not close cleanly: the marble jumps 3 mm just before key 2 (the closure had to clamp note 1's angle or Bounce)." The loop closes, but look at the first keys.
- The course check, "Course check: clean (24 keys)." or which keys need you, for example "Course check: 2 keys need you - key 41 passes through its own key · key 42 touches its own base" (see Generate report).
When Generate finishes, the 3D view looks through the course's camera, ready to press play.
The status bar clears when you move the mouse. Anything you need to act on is also a row in Course Check, which stays until the cause is gone.
Generate never leaves half a course. If something stops it, nothing is changed and the report says why, for example "The add-on's built-in course pieces could not be prepared; nothing was changed." or "The loop cannot close: no closing flight gives note 1 a real bounce. Nothing was changed -- try another seed."
The marble's look
The built-in marble is the glass Hero Marble, in Marble Studio Free and Marble Studio Pro alike. Its glass reflects the HDRI image of the scene's world.
- In EEVEE, glass needs raytracing. In a new file whose engine is EEVEE with raytracing off, Generate switches it on and the report says "Raytracing switched on in Render Properties so the glass marble looks like glass in EEVEE." It does this once per file and never in Cycles; if you turn raytracing off again, it stays off. A file you generated in Cycles and switch to EEVEE later is not switched for you: turn on Raytracing in Render Properties yourself.
- Your own world is kept ("Kept your world 'World'."). If that world has no HDRI image, the report says "No HDRI found in this world, so the marble's glass shows a plain mirror."
- Generate again after changing the world or its HDRI image, so the marble reflects it. Turning the HDRI or changing its strength follows live.
- In Material Preview the M inside the marble can look green: that is Blender's studio light. Tick Scene World in the viewport's shading options to see it as it renders. Renders are not affected.
What gets replaced
A new Generate (or Next Seed) replaces the course in this file: the keys, bases, marble path, and loop are rebuilt from scratch, and your key edits on the old course are gone. Save before you press it: re-opening the saved file is the way back (not Ctrl+Z, see below).
What stays:
- Your own objects. Anything you added (props, lights, decor) is left exactly where it is.
- The built-in pieces (marble, key, base, wall material, lighting) are reused, never duplicated: a second
Generate does not leave
.001copies behind. - Your camera moves Pro. Points of interest you keyed on the camera control stay; see Camera (Looping).
Do not press Ctrl+Z straight after Generate or Next Seed
An undo immediately after Generate or Next Seed can crash Blender. Save before you Generate. To go back to the old course, re-open the saved file. See Known issues.