Course Editor
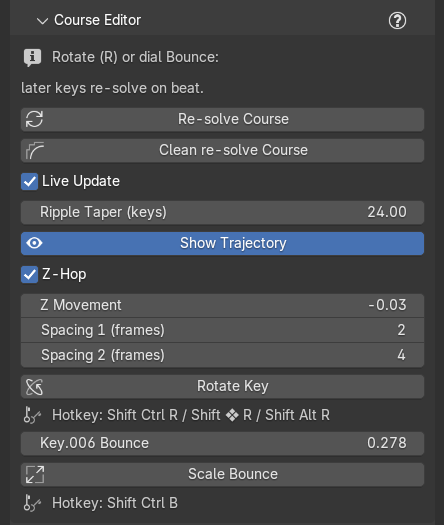
The Course Editor is where you shape a generated course by hand: turn keys, change how lively they are, and let Marble Studio re-flow everything after them so every strike stays on its note. The loop tools (Loop Nudge, Set Loop Note to Playhead, View Loop Note One / Two) are in the Seam section, on their own page: Seam and loop tools.
The Course Editor holds only controls and their hints. Warnings about the course (a key the marble passes through, an edit that has not settled) are rows in Course Check, so the buttons you are pressing never move while you work.
With no course in the file the section says "(No generated course in this file)". If keys exist but the marble is not set, it says "Set the Marble in Setup (above) to activate.": set Marble in Setup.
Rotate a key
Select a key and rotate it with Blender's own R (or the rotate gizmo). The section's hint lines say it: "Rotate (R) or dial Bounce:" / "later keys re-solve on beat."
A moment after you let go, the course re-flows: the marble leaves the key at its new angle, and the keys after it move to catch it on their beats. How far the change spreads is set by Ripple Taper.
Drag a key so far that the loop has to grow, and the status bar says so while you drag, for example "Loop 12 frames longer; the course re-flies when you release". Let go and the course re-flies with the longer loop.
- Undo: never press Ctrl+Z right after Generate or Next Seed. Some edits take two presses to step back, because the re-flow after them is a step of its own; when one press is not enough, Course Check shows a plain-fact row, Edit not settled, and one more press (or Re-solve Course) finishes it. See Undo.
- Any key, its base, its ghost, or the loop note can also be turned with Rotate Key ("Select a course key, its base, its seam ghost or the loop note first." if nothing suitable is selected). It reports "Seam key set to 12.5 deg (40 keys, loop closed).", or for a ghost, "Turned key 4 to 12.5 deg (you selected its ghost at the loop's end; the ghost follows its real key) -- 40 keys, loop closed."
Keys stay where the course puts them. Blender's move (G) and scale (S) do nothing to a course key, its base, or a ghost: the course places every key, so only turning (R, Rotate Key, Bounce) changes one. The one exception is note 1: move it and the whole course moves with it.
Recipe: open up a cramped passage. Select the key before the cramped notes and turn it a few degrees so it faces more upward. The marble leaves on a higher arc and the keys after it spread out.
Bounce
When a key is selected, a slider named after it appears at the bottom of the section (for example Key.012 Bounce). Bounce is how much of the marble's speed the key gives back: lower is a short, dead hop, higher a long, lively one. Changing it re-flows the course exactly like a rotation.
Recipe: a big leap before the chorus. Select the key before the chorus and raise its Bounce. The marble flies higher and further; the keys after it move to meet it on the beat.
Scale Bounce
Scale Bounce changes the selected key's Bounce with the mouse, without a trip to the slider:
- Select a key and press Ctrl+Shift+B (or click Scale Bounce).
- Move the mouse right or up to open the bounce out, left or down to pull it in. Up-right does both.
- Type a number for an exact multiple, hold Shift for fine control.
- Enter or left-click confirms; Esc or right-click cancels.
While you drag, the status bar shows the key, its Bounce, and the factor, for example "Scale Bounce Key.012 0.620 (x1.240) Right/Up: more bounce, Left/Down: less Shift = fine, type a factor, Enter/LMB confirm, Esc/RMB cancel" (with "(min)" or "(max)" at a limit, and what you typed in brackets). The Hotkey: line under the button reads the hotkey from your own keymap, so it shows your binding if you changed it. The button is grayed when no key with a Bounce is selected. See Hotkeys.
Re-solve Course
The button names what it acts on: Re-solve Course. It recomputes the course from every key's current angle and Bounce, with the same gentle ripple as a live edit. Every strike stays on its beat and the loop stays closed.
You rarely need it with Live Update on. Use it after editing with Live Update off, or when Course Check shows the Edit not settled row and you want to keep the edit. A press also refreshes every Course Check row.
Re-solve from Scratch
Re-solve from Scratch lays the course out from scratch using every key's current angle and Bounce, without the ripple history of your edits. Many small edits in a row can leave a course looking bunched or jumbled; this straightens it out. Keys far from anything you touched may move. The loop stays closed and on the beat.
Recipe: tidy a much-edited course. Save, press Re-solve from Scratch, and play it through. Liked it better before? Press Ctrl+Z.
Live Update
Live Update (on by default) re-solves the course and redraws the path the moment a key is rotated or its Bounce changes. Turn it off to make several edits and then re-solve once with Re-solve Course.
Ripple Taper
Ripple Taper (keys) sets how many keys an edit's ripple reaches, in both directions around the loop (24 by default, from 1 to 400). Smaller keeps edits local; larger lets more of the course shift. The loop stays closed either way. See Ripple. If a ripple leaves a key clipping the marble, Course Check's Keys to fix row names it, for example "clips its own key (2 mm)".
Show Trajectory
Show Trajectory shows or hides the marble's path line (and its copies at the seam) in the viewport. The line never renders. Generate and re-solves keep your choice.
Front View: Follow Marble
Front View: Follow Marble (in the Camera (Looping) section) snaps the 3D view to the front and locks it on the marble, so it stays centered as the animation plays: "Front view locked on the marble (navigate or press again to release)." Press it again, or orbit or pan the view, to let go ("Front-follow released (view unlocked)."). The mouse wheel zooms and keeps the lock, so you can zoom in on the keys while it follows. Hotkey: Ctrl+Shift+0 (or Ctrl+Shift+Num 0). In a file without a course it says "No marble yet: press Generate first." (or "No marble set (Setup > Marble)." when Setup shows the Marble field).
The two seam view buttons, View Note One (Start) and View Note Two (Loop), are in the Seam section (Seam and loop tools). View Loop Note One says "No generated course in this file." without a course and "No 3D viewport to frame." without a 3D view to turn; View Loop Note Two says "No loop note in this course."
Z-Hop
Z-Hop gives every key a small recoil when it is struck: the key dips into itself on its strike frame and springs back, while its base stays planted. It is keyframed on top of the course and never changes the marble's path. The loop note and seam ghosts are left out. Z-Hop is on for a new course.
- Z Movement: how far the key dips, in meters along its own up axis. Negative dips into the key (default −0.03). Dragging moves it in 0.01 steps.
- Spacing 1 (frames): frames from the strike to the deepest point (default 2).
- Spacing 2 (frames): frames from the deepest point back to rest (default 4).
Both spacings are counted at 60 fps and kept the same length in seconds at your course's frame rate: at 30 fps the hop uses half as many frames, at 120 twice as many. So a value looks the same whatever rate you chose.
The three dials are grayed until Z-Hop is ticked. In Marble Studio Pro, a Strike flash follows the hop's timing when both are on.
Recipe: a softer, slower recoil. Tick Z-Hop, set Z Movement to −0.02 and Spacing 2 to 8.
The dials apply to the whole song: keyframing Z Movement over time has no effect.